Caching improves the performance of a WordPress website in the fastest ways. Following techniques shows how to implement caching on a windows hosting account, to implement caching on a Linux Hosting account follow the previous post What is WordPress Caching & How to Install W3 Total Cache Plugin.
1. Enabling Caching using clientCache
With our Windows hosting accounts, you can create caching rules to enhance your website’s speed by using clientCache in your Web.config file.
Microsoft has instructions on implementing clientCache here, as well as more detailed information about the element here.
Example
Microsoft uses the following example code in a Web.config to enable caching:
This will cache the content you define as static until Jan. 19, 2038.
2. Enabling Wincache’s Opcode Cache
Wincache is PHP extension that Microsoft® wrote to improve the performance of PHP applications on Windows-based platforms. All Web Hosting Windows accounts have access to the performance-enhancing power of Wincache, but it’s disabled by default.
You can find out more about how Wincache works by visiting PHP.net.
To enable your php scripts to cache in the memory (called an opcode cache), you need to edit your account’s php5.ini file to include this directive:[wincache]
wincache.ocenabled = 1
Note: This setting affects all PHP scripts on the hosting account. Enabling it might interfere with other applications you have installed.
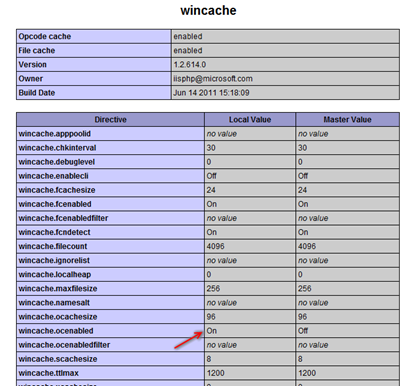
This change might take up to five minutes to become active on your site. To see if it’s active, open a plain text editor and create a file called phpinfo.php. Insert the following line:
Save this file to the root of your website and then browse to yourdomain.com/phpinfo.php.
The wincache.ocenabled parameter display as On for the local value.

Thanks for visiting. For queries and suggestions, emails are welcome at learnweb@hostingcolumn.com.
Subscribe to Hosting Column for latest updates and posts.

